
This is the fifth part of my day-by-day account of what it was really like to climb the Lemosho Route up Mount Kilimanjaro. If you missed it, here’s Day Four or start from the beginning with Day 1 – Getting Started.
Today I’ll talk about the dreaded Barranco Wall.

What is the Barranco Wall?
Despite its name, the Barranco Wall isn’t an actual wall but rather a steep, rocky ridge located on the south slope of Mount Kilimanjaro. It stands roughly halfway up the mountain, at an elevation of 2,573 meters (8,438 feet). Here, the path traverses the ridge in a series of switchbacks, making it accessible to most hikers with good fitness and basic scrambling skills.
Despite its steep and scary appearance, the Barranco Wall isn’t a true technical climb as it doesn’t require any specialised equipment or skills.
The Barranco Wall: an overview
- Location: South slope of Mount Kilimanjaro, Tanzania
- Elevation: 2,573 meters (8,438 feet)
- Length: About 2 kilometers (1.2 miles)
- Height gain: 400 meters (1,312 feet)
- Difficulty: Moderate (graded Class 4 on the Yosemite Decimal System)
- Features: Zigzagging path, loose scree, stunning views

Where is the Barranco Wall on the Kilimanjaro hiking itinerary?
The Barranco wall typically falls on Day 4 for 7-day Kilimanjaro climbs, or Day 5 for the 8-day climb (which is what I did).
Here’s the breakdown:
- Ascending Kilimanjaro: Starting from lower elevations, you progress through various camps and terrain before reaching the Barranco area.
- Barranco Camp: You’ll set up camp at Barranco Camp (sometimes spelled Baranco Camp), situated within the Barranco Valley, at an elevation of 3,900 meters (12,800 feet). This is where we spent the night on Day Four.
- Conquering the Wall: After resting and acclimatising at Barranco Camp, you tackle the Barranco Wall.
- Continuing the Journey: After conquering the wall, you’ll proceed through more terrain and camps on your way to the summit.
Click here to start planning your dream Kilimanjaro adventure!
How hard is the Barranco Wall?
There had been a lot of speculation about the Barranco Wall (sometimes spelled Baranco Wall) in the days leading up to Day Five.
Several members of the group had read about its existence online and opinions had varied wildly about whether it was going to be a fun boulder-scramble or a terrifying ascent up a sheer rock face, clinging on with fingertips and toes to avoid tumbling to our deaths in the abyss below.

And from a distance, looking up, it seemed like it might be closer to the latter! But when you get closer you realise that it’s a lot less deadly than it looks, and you don’t actually need any technical climbing skills or equipment to get up it.
And to be honest, if you’re worrying about dying on Kilimanjaro, it’s not the Barranco Wall you should be afraid of. By far the leading cause of death or serious injury on the mountain is altitude sickness (or AMS – Acute Mountain Sickness) – though if you take it slowly and follow the guides’ advice you shouldn’t need to worry too much about that either.
And anyway, I was looking forward to the challenge. A lot of the walking on Kilimanjaro is just slow plodding, one foot in front of the other, for hours on end. That does give you plenty of time to enjoy the impressive scenery, but all the same, I was totally up for something a little more adventurous. Why else do you come to Kili, after all?!
How high is the Barranco Wall?
Although it can look terrifying from below, the Barranco Wall is actually only 257 metres or 843 feet tall. That’s about 2/3 of the height of the Empire State Building or just a little bit smaller than the Eiffel Tower.
No problem!

Have there ever been any Barranco Wall deaths?
While Mount Kilimanjaro sees approximately 10 climber deaths every year, there are no officially reported deaths specifically on the Barranco Wall. This suggests that despite being a challenging section of the climb, the Barranco Wall itself isn’t inherently more dangerous than other parts of the mountain.
It’s important to remember that deaths on Kilimanjaro are primarily attributed to altitude sickness. The rapid ascent combined with high altitude can lead to serious medical complications, even for seemingly healthy individuals. Other contributing factors to fatalities include falls, hypothermia, exhaustion, and pre-existing medical conditions.
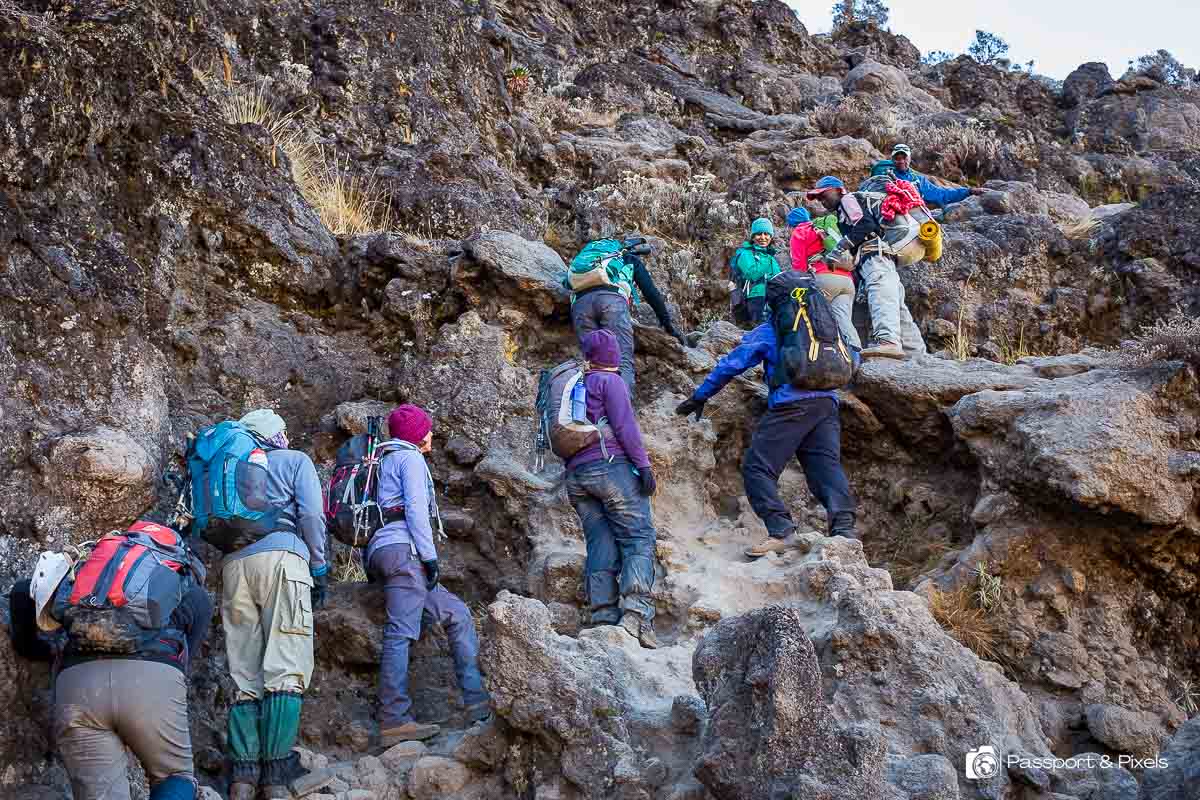
Taking on the Barranco Wall challenge
So with all our overthinking done, up we went. Picking our way between rock formations, grabbing onto ledges and pulling ourselves up, all the time looking for the next place to put a foot or a hand. It was pretty slow going, but more interesting than the usual walking because you had to engage your brain as well as your body. And it was fun!

And even though for a long time it seemed as though the top was never getting any closer, when I looked back and saw how far we’d come, I did feel pretty chuffed.
But then I looked at the porters, and I didn’t feel quite so proud of myself…

These guys (and girls) are astonishing. While we’re using all four limbs to scale the Barranco Wall, tentatively working our way up, and wearing backpacks that weigh no more than about 8 kilos, they’re doing it faster, carrying more than twice as much, on their heads, with no hands free!

I’m not sure the photos really give you the full sense of how amazing they are, so here’s a short video:
Because the trail is so narrow, there’s no way for the porters to overtake. So the climb does take longer than it should because you have to stop and let them pass. I didn’t mind though: enforced stopping is great for photography!

How long does it take to climb the Barranco Wall?
The ascent takes about 2-3 hours depending on your pace and fitness level. It took me about 2 hours to get to the top of the Barranco Wall, and when I did, my efforts were well-rewarded by a splendid view of Kilimanjaro’s main peak, Kibo on one side, and looking back down into the Barranco Valley on the other side.

And having gained another 300 m of altitude, we were most definitely above the clouds (though to be fair, we had been for some time!)

The rest of the day’s walking was mostly flat or downhill, with one last, steep ‘up’ to reach the campsite. When you can see that ahead of you it can be a little disheartening, and we’d already learned from the previous days that even when the end is in sight, it can often still take a really long time to get there!
But we made it eventually, helped along by some of the porters, who not content with having already done that last uphill once, came back down and helped some of the more tired members of the group by carrying their day packs for them. What heroes!

The Beautiful Karanga Campsite
With the terrifying Barranco Wall now done and dusted (and yay, no one fell off or died!), here’s our home for the night: Karanga Camp, right in the shadow of Kibo at 3995 m. The large tents you can see in the photo are the mess tents, where groups have their meals together, and also the cooking tent where the magic happens!

I would say Karanga campsite is definitely the most scenic of all the Lemosho Route campsites. From my tent, I had this stunning view of Mount Meru, floating above the clouds with the sun setting behind.

Obviously with that view I couldn’t just stay inside the tent, even though it was getting pretty chilly.

Night Sky Photography on Kilimanjaro
And then the stars came out. There isn’t a great deal to do in the campsite after it gets dark… well not for most people, anyway. But if you’re a photography nut like me, this is when it gets really exciting! I didn’t have an SLR with me, but I did have my new Fuji X100T with full manual control, so I was still able to take long exposures like the one below, showing the campsite, the cloud base, and the Milky Way.

I’d left my tripod behind to save weight, so the camera had to be carefully balanced on a rock. This meant getting the tilt and the angle right was a little tricky, but with a bit of horizon adjustment in the computer afterwards I was able to produce this: the campsite at night with the summit of Kilimanjaro behind. Epic.
I took this on my Fuji X100T at f/2.8, with a 30 secs exposure.

It was pretty cold but with the worry about the Barranco Wall now gone, I actually slept pretty well!
To find out what happened next, go to Base Camp | Kilimanjaro Lemosho Route 6.
Watch the video
If you want to see what it was really like to climb Kilimanjaro’s Lemosho route, here’s a little video I made of the experience.
Where to next?
For more Kilimanjaro and Tanzania posts, why not try…
- An Overthinker’s Kilimanjaro Packing List
- How To Train For Kilimanjaro: A Complete Overthinker’s Guide
- Ol Doinyo Lengai Tanzania – Climb the Terrifying Mountain of God
- A Safari In Tanzania: A Sneaky Peek Behind The Scenes
- Kenya Vs Tanzania: Travel Experts Decide
Bella is a multi-award-winning travel writer, wildlife photographer and science and history documentary director from London. Among many awards and nominations she won Blogger of the Year at the British Guild of Travel Writers’ Awards 2023 and Best Photography at the Travel Media Awards 2020. Her work has been published by National Geographic, Wanderlust, and BBC Travel among others. Her films have been shown around the world including on the BBC, Discovery and PBS.


