

So you’ve booked your dream African safari, and you’re ready to go!
I imagine you’re excited for the adventures, the landscapes, the amazing food and the friendly people, but mostly for all that incredible wildlife you’re going to see – and photograph.
But you don’t want to spend all that money and go all that way, only to come back with rubbish photos! You want to make the most of the opportunities that are about to unfold in front of you, and come home with stellar safari images to post on Instagram and put up on your wall.
If that’s why you’re here – you’ve come to the right place!
Welcome to my top 40 African safari photography tips, to help you bring home wildlife photos you’ll treasure for years to come.

About my safari photography experience
Hello! In case we haven’t met, I’m Bella, and I’m an award-winning travel and wildlife photographer.
I’ve photographed wildlife on all seven continents, from penguins in Antarctica to puffins in the UK and from whales in Sri Lanka to sloths in Costa Rica.
In 2020 I won Travel Photographer of the Year at the UK Travel Media Awards (and was a finalist in 2019 and 2023 too).
My wildlife images have been shortlisted five times in the world-famous Wildlife Photographer of the Year competition. I’ve written and photographed for National Geographic Traveller, BBC Wildlife Magazine and Travel Africa among others, and I’ve led workshops and written guides to travel photography and wildlife photography.
Read more: 60+ Awesome Antarctica Photography Tips

But most importantly, I love safari photography!
I’ve worked with safari companies in Botswana and Kenya to shoot images for national publications, and I’ve also photographed safaris in South Africa, Ghana, Tanzania and Uganda (where I lived for three months).
Throughout all of that I’ve learned a few things about how to make the most of your safari photography tour, and I’d like to share some of that knowledge with you now.
I’ve tried to write this for beginners and intermediate shooters so I’ve kept it fairly simple, but hopefully there are tips and inspiration in here for more advanced photographers as well.
Let’s get started!

Wildlife photography for beginners: some troubleshooting
If you’ve come here looking for Africa safari photography advice, that probably means you’re currently a bit dissatisfied with your wildlife photography.
So first up, I want to discuss some of the reasons why you might be finding your photos disappointing, and what you can do to deal with some of those issues.
The animals are too far away
If you’re annoyed because the wildlife in your photos appears too small, you need to get closer! You can do that in one of three ways:
- Ask your driver to move closer (if it’s possible without breaking any rules or disturbing the animal).
- Wait and hope the animal comes closer to you.
- Zoom in. If you’re already fully zoomed in, then you’re gonna need to buy a bigger lens or a better camera. You could also crop the image later, but how much you can get away with depends on the resolution of your camera.

The photos are blurry
Blurred images happen for one of three reasons:
- Camera shake. Use a faster shutter speed to counteract things like bumpy roads or shaky hands.
- The animal is moving too quickly. Again, you need a faster shutter speed to freeze the animal’s motion (unless you’re going for an artistic slow shutter speed effect).
- Your image is not in focus. Modern cameras have extremely advanced autofocussing systems but if you don’t know how to use yours properly, it can and will make bad decisions. Get properly acquainted with your camera’s focussing system, and practise using it!

The images are poor quality
If you’re not happy with the resolution or quality of the images your camera produces, I’m afraid the only answer is to buy a better camera!
But this doesn’t mean you need to splurge thousands on a top-of the range new camera. You can get great deals on older camera models second hand, and many of them are excellent.
I shot this image using a Canon 5D Mark II which you can buy today second hand from Wex, MPB.com or eBay for less than £200.

The lighting is bad: the image looks too harsh, too dark, or too flat
Most safari game drives take place in the early mornings and late afternoons which is when the animals are usually most active. Happily, this tends to also be the prettiest light for photography, but sometimes it can be quite dark. So in an ideal world you should also have a camera that can cope well in low light.
If the light is dull, flat or too harsh, there are still ways round it. Try changing the position of the car so the subject is backlit, or using a high- or low-key technique to exploit strong contrast.
Learning to edit your images will also make a huge difference: shoot in RAW and then try adjusting the exposure, highlights and shadows, or convert to black and white.
Read more: How To Make A Stunning Photo Gallery Wall: My 7-Step Guide

Safari photography tips: before you go
1/ Choosing your camera
Your trusty camera is your window into the wild, so pick the right tool for the job! While it is possible to take great safari images with a smartphone, unfortunately you will be very limited by what your phone camera can do.
If you really want to get those beautiful closeups and soft backgrounds, you’ll need a DSLR or a mirrorless camera with interchangeable lenses – or at the very least a compact camera with a good zoom lens.
You also need to consider factors like how much weight you’re prepared to carry, weather sealing (dust and rain resistance), image stabilisation, and how well it performs in low light.
In Tanzania and Uganda’s national parks I used my much-loved Canon 5D Mark IV; for my recent trips to Botswana and Kenya I upgraded to a Canon R5 mirrorless which has a much faster focussing system with animal eye detection which is a total game changer for safari photography.

2/ Learn your camera
That said, there’s no point in splashing out thousands on a fancy camera if you don’t know how to use it. The best camera for safari photography is always the one you know well and are comfortable using.
So if you do splurge on a new camera, don’t be caught fumbling with settings when that perfect wildlife moment arises! Make sure you learn its functions beforehand, explore the menu, and practise using it so that it feels like second nature by the time you’re out in the bush.
I took my new R5 to London Zoo and London Wetland Centre before heading to Kenya, so that I could get it set up how I like it and get any teething troubles out of the way in a controlled environment.

3/ Master your camera’s focus
Modern cameras have extremely intelligent focussing systems that take much of the trial and error out of focussing – but you do need to know how to control them or they’ll take over and get things wrong!
It’s vital you learn how your camera’s focusing system works, get it set up in a way that works for you, and practise focusing on moving subjects.
Experiment with single-point autofocus for static subjects and continuous autofocus (or servo mode) for tracking moving animals. Don’t be afraid to manually focus for a critical shot, but I normally reserve that for when the subject is still and the autofocus can’t cope – such as a lion sitting amongst tall grasses.
Many newer cameras have fantastic animal eye detection AI but it doesn’t always work and you need to know how to take over quickly if it doesn’t want to play ball.

4/ Pick the right lenses
The lens you choose will dramatically impact the types of shots you can capture.
A telephoto lens (200 mm and above) is essential for bringing distant animals closer – and I’d recommend a minimum of 400 mm.
Consider a zoom lens for versatility, but a prime lens offers superior image quality at a fixed focal length. Don’t forget a wider lens (24-70mm range) for capturing landscapes and dramatic animal encounters at close range.
Prime lenses or lenses with a wide maximum aperture (f/4 and below) give you more of that lovely shallow depth of field and perform better in low light, but big prime lenses like the Canon RF 400mm f2.8 L are very large and eye-wateringly expensive!
Check out my guide to camera gear for wildlife photography in Antarctica – you can obviously ignore the cold weather and water sections but all the camera and lens advice is pretty much the same.

5/ Take a second body
It’s a luxury, but if you do have a second camera or a spare body, I recommend you bring it.
Animal encounters can change in the blink of an eye, and you don’t want to be rushing to change lenses when the lion suddenly comes right up to you, or when you want to switch between a close up and a wide shot showing the environment.
The African bush is also very dusty, so not having to change lenses while you’re out and about will help protect your gear.
I always take two cameras – one fitted with a long lens for close ups or animals that are far away, and one fitted with a wide lens for landscapes or if an elephant is right next to the car. A backup camera is also there should some misfortune befall your main camera.
If you don’t have a spare, why not buy an older model, cheap and second hand? You can get great deals on pre-loved gear and having a second camera will definitely add more flexibility to your African safari photography.

6/ Protect your gear
If you’re going to take all that expensive gear to Africa and expose it to the dust, wind, sand and possibly rain, you’d better protect it!
Invest in a decent padded backpack, and a rain cover for when an unexpected downpour blows in through the side of your open vehicle. Make sure you bring plenty of lens cloths and a dust blower, and give your gear a wipe at the end of every day to keep it in top condition.
And don’t forget proper insurance! Most cameras are too expensive to be covered by your travel insurance policy, so check and get separate gear insurance or cover it under your home insurance policy instead.

7/ Shoot RAW and learn to edit
While RAW files take up more space and need post-processing, they capture more data than JPEGs and offer the flexibility to edit your images to bring out their best.
If you really want to take your wildlife photography to the next level, one of my top safari photography tips is to shoot RAW and learn some editing skills, to transform your images from good to great.


8/ Dress for success
Neutral-coloured clothing blends into the environment, making you less likely to spook the animals.
Opt for natural fabrics or sweat-wicking sportswear that breathes well in hot weather, and avoid bright colors and noisy clothing that might startle wildlife.
Read more about what to pack for safari here.

9/ Beanbag, tripod or monopod?
If you’re taking a large telephoto lens, you’ll need stabilisation. It’s hard to hold a heavy camera and lens for long periods at a time!
Some safari companies provide beanbags for you to rest on the window ledge or roof, while others have adapted their cars with padded arm rests to balance your camera on. So it’s worth asking before you travel.
I usually pack an empty photography beanbag, which I can then fill with beans or rice at the local market when I arrive.
A tripod or monopod can offer even greater stability but can be impractical if you want to change your angle in a hurry, or if you don’t have much space. However, if you have a monopod (and trust it!), you can also use it to lower your camera over the side of the car for eye-catching low-angle shots.

10/ Don’t forget spare cards and batteries
Running out of power or storage on safari is a recipe for disappointment!
Pack plenty of fully-charged batteries and enough memory cards – you’ll probably shoot way more than you usually do. Consider high-capacity, fast cards for capturing bursts of action, like birds in flight or a cheetah on the hunt.
Cards are expensive, so I bring just two, and then back up my photos daily onto a portable hard drive before reusing the cards the next day.
Find out more about my travel photography workflow here.

African safari photography tips: practicalities
Getting the best out of your safari photography begins before you leave the lodge – in fact, you could say it begins before you even get on the plane!
Here are some things to think about before you head out on your safari adventure:
11/ Ask about your vehicle
Not all safari vehicles are created equal. Before you book, find out what type of car you’ll be using. Will it be open sided; will it have a pop-up or a roll-back top?
Does everyone get a window seat, or will some people have to sit in the middle? Is there tiered seating and will you be able to get down low?
Ideally, you want a car with open sides and a pop-up or open roof for unobstructed views. At all costs avoid tour buses or normal-style jeeps with windows that don’t open fully.
I prefer to book with companies that offer smaller vehicles (maximum six people per car) and a guaranteed window seat. In an ideal world, you’ll be able to have an entire row to yourself, so you have a prime spot no matter which side the animal is on.
Knowing the vehicle will also help you choose the right accessories to bring: do you need a monopod or a beanbag? Will you have space to spread your gear out or will you need to bring a more compact setup?
Read more: What Happens On An African Photo Safari: Are They Any Good?

12/ Consider a private car
For the ultimate in control and flexibility, a private safari vehicle might be better for you if you have the budget.
Not having to worry about what other people want to do, or compete for the best angles, allows you to tailor the itinerary to your photographic goals, spread yourself around the car, and get in the perfect position every time.
Looking for African safari tours? Search TourRadar for a huge selection from 5* operators

13/ Talk to your guide
Your guide is your key to unlocking the secrets of the bush – he or she is the person who’ll hopefully help you find your dream safari animals or get the shots you’re after.
What’s more, a good guide who understands light and angles is probably the number one most important thing you can have for safari photography.
So before the trip or when you first arrive, I always tell the company I’m a photographer and ask to be assigned their best photography guide.
I noticed a huge difference in both Kenya and Botswana between the shots I got with a guide who really ‘got’ photography, and the ones who didn’t.

Chat to them before you head out on your first game drive. Let them know the wildlife you’re hoping to see and the shots you’d like to get, and they will do their best to help you.
When you’re out and about, don’t be afraid to ask if you want something. The guide won’t know what shot you have in mind, so if you want to stop, move on, nudge the car forward or back a little, get a little closer, or find a different angle, just ask.
It might not always be possible or allowed, but they will do their best to help you if they can.
Remember though, that guides, while brilliant, are not miracle workers. If you’re desperate to see a leopard, they will use all their skills to help find one, but unfortunately the animals don’t perform on demand and sightings are never guaranteed.

14/ Don’t just talk, listen!
As well as communicating your needs effectively, it’s important to listen. Guides are a goldmine of information when it comes to animals – not only in general, but they will also know the habits of specific animals in their patch.
Your guide will be able to tell you where and when you’ll have the best chance of seeing a certain species or where certain individuals like to hang out.
Once you’ve found the animal, the guides are experts at recognising behaviour cues and will be able to tell you if the lion is about to stretch or the hippo is about to yawn, so you can capture the money shot.
In Kenya, our guide Saruni anticipated that this lion would be thirsty after eating and would walk to this puddle to drink, so he positioned the car in the perfect spot and then all we had to do was wait for the lion to come to us.

15/ Get up early and stay out late
Lighting is crucial in photography. Early mornings and late afternoons offer the soft, golden light that creates stunning wildlife portraits, while midday sun can be harsh, creating strong contrast and deep shadows.
Typically, most safari itineraries include morning and afternoon game drives, as that is when the animals are most active. Make sure you’re ready to go – if you hit snooze or dawdle over breakfast, you’ll may miss the best moments.
Likewise, at the end of the day many safari companies offer ‘sundowner’ drinks and snacks – which is exactly when you want to be photographing.
So I always let my guide know that I’d prefer to skip cocktail hour and keep shooting instead (which is much easier to do if you’re not sharing the car with non-photographers who don’t take kindly to this!).
This won’t be a problem if you book a dedicated African photo safari with like-minded photographers, which I highly recommend if you can afford it!

16/ Try a hide
While you certainly don’t need to visit a dedicated photography hide to get close to wildlife in Africa, it can help! And more and more lodges are building hides and offering them to guests who want to sit and watch the wildlife come to them in comfort.
From simple covered spaces overlooking waterholes, to all-bells-and-whistles compounds with bunks for sleeping, night lights and 24/7 monitoring, Africa has some incredible photo hides to visit, where you can get incredible shots you’ll never be able to achieve on a game drive.
Read more: Wildlife Hide Photography Tips For Safari Photos Like A Pro

Safari photography tips: framing and composition
17/ Think About Your Composition
Now you’ve sorted the practicalities, it’s time to think about the images you’re going to take. Don’t just snap what’s in front of you – instead, think about what you want to include or leave out, and where you want the main focal point to be.
You’re probably already familiar with the Rule of Thirds, where you imagine dividing the frame into thirds and then place your subject off-centre on one of those ‘third lines’ to create a more pleasing composition. Give it a go!
I explain more about the Rule of Thirds, as well as giving loads more general wildlife photography tips, in my Easy wildlife photography tips for beginners post.

18/ What’s in shot? Keep it simple.
Be mindful of what fills your frame. Where possible, try to avoid clutter and distracting elements like branches or leaves that obstruct your subject. If necessary, change position in the car or ask the driver to move back or forward a little to get a better angle.
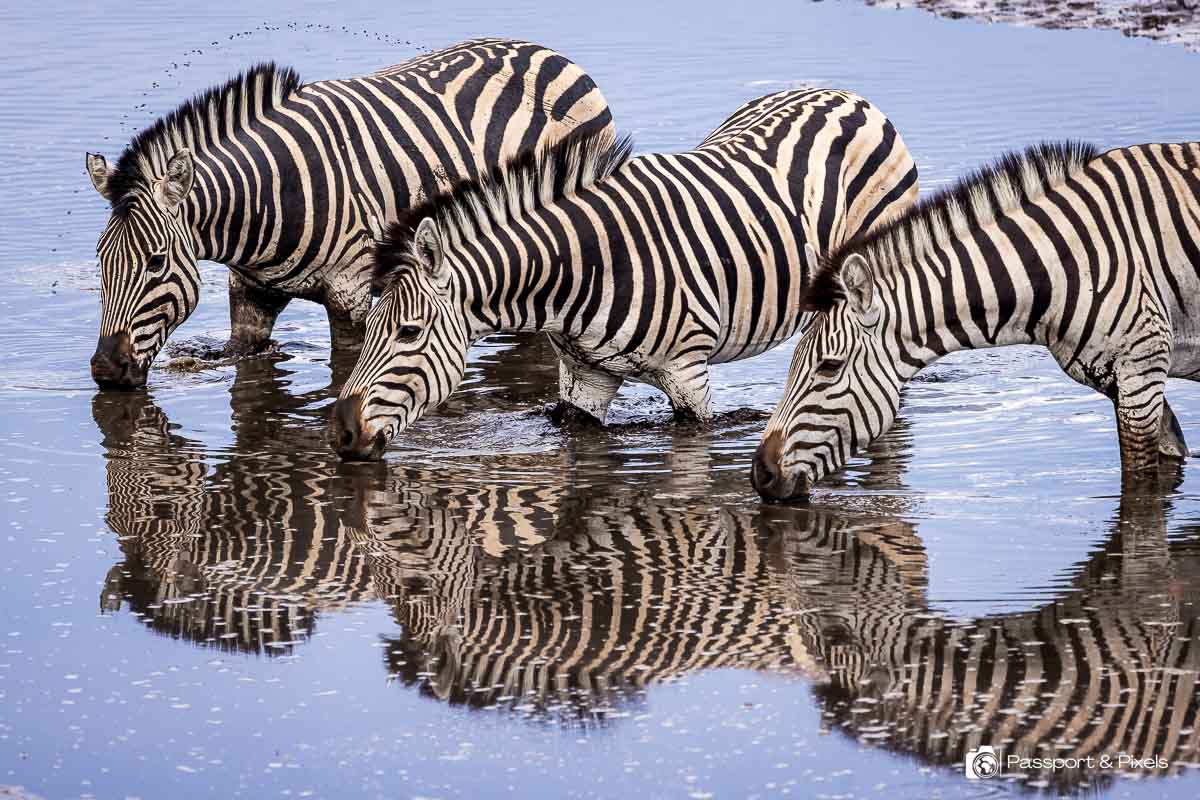
Avoid photos with too many elements competing for attention. Where there are many animals together, try to isolate one to three individuals, or wait for the group to space out a little to create a clean composition.
There were many zebras at this waterhole at Leroo La Tau in Botswana but I focussed on just these three to create a simple composition
19/ What’s in the background?
A messy background can detract from your subject. Whether that’s tangled trees or random other animals, try to aim for clean backdrops that don’t distract.
If necessary, ask your driver to move the car, or wait for the animal to move into a better position.

20/ Focus on the eye
In wildlife photography, it’s generally accepted that you should always focus on the main animal’s eye. We want the viewer to connect with the subject, and we are naturally drawn to eyes, so if the eye isn’t in focus the viewer’s connection to the image may be lost.
There are exceptions of course, such as if the eye isn’t visible in the shot, or you’ve deliberately chosen something else to focus on, but as a general rule of thumb, you should always get at least one eye sharp.

21/ Wait for eye contact
Connected with this, notice how when the animal’s gaze is locked on you, it creates an extra dramatic connection.
Some safari animals are curious and will look right at you, so keep your camera poised and ready to click the shutter at that crucial moment when your subject looks right at your lens.

22/ Get low
Sitting in a car, with the animal on the ground, most of the time you’ll be looking down on your subject and the background will be the grass around it.
It’s not easy to do because most of the time it’s not safe to get out of the car, but if you can get down to the same level or lower than your subject so it’s framed against the sky instead, it makes for much more dramatic images.
You obviously can’t do this when there are predators around, but if you ask your guide, it may be possible if the animal is a herbivore, it’s far enough away and you stay close to the car. I shot these rhinos by staying safely behind the car, and lying on the ground so I could shoot underneath it.

23/ Shoot landscapes
Another top safari photography tip to remember is that going on safari isn’t just about the animals.
Don’t forget to capture the vastness and beauty of the African landscape, from the wide savanna grasslands, to lonely trees silhouetted against the sunset, to dramatic mountains on the horizon or reflections in lakes and wetlands.

24/ Include the environment for context
Show how your animal subject interacts with its environment. Did you spot a lioness stalking through tall grass or a solitary giraffe eating acacia? Close ups can be dramatic and beautiful but including context can tell a different story.
In Tsavo West, Kenya, I was amazed by the magnificent elephants which are often stained red or orange thanks to the landscape’s red dust. In this image I wanted to show how the elephants’ vivid colour stands out in the dry landscape and is mirrored by the orange dust bath just behind them.

25/ Shoot silhouettes
Sunrise and sunset are the most magical times for safari photography. And if you get dramatic colours in the sky, you can shoot sensational silhouettes.
Find a recognisable animal – giraffes and elephants are great for this – and then get down low (positioning your car a little downhill is ideal) so the animal’s shape is against the sky and you can see its legs.
Time the shot so all the legs and the tail are visible, and underexpose by a stop or two to bring out the sky and turn the animal into a dark silhouette.

26/ Use the beauty of backlighting
It’s tempting to always have the sun fully illuminating your subject from the front, but moving round to the other side so the animal is backlit often gives much more attractive results.
Low backlighting at the beginning and end of the day also illuminates grasses and creates a beautiful rim of light around your animal, highlighting the texture of its fur.

27/ Look up and around
Don’t forget to look skyward! Capture African birds soaring overhead, or giraffes munching on leaves from tall trees.
And don’t forget to look behind you too. While everyone is clicking away at resting lions, there might be some hyenas or a band of mongooses on the other side of the car.

28/ Include soft foreground elements
Frame your shot with interesting foreground elements like wildflowers, tall grasses, or branches, using a wide aperture and shallow depth of field to make them soft focus. This creates depth in your image and draws the viewer’s eye towards your subject.
This spoonbill standing by a lake was a pretty boring shot, until I moved behind the bush to create a natural frame around the bird.

29/ Include cars and people
As well as taking shots of the animals you see, don’t forget to include people too.
Sometimes lions, elephants and other wildlife comes extremely close to the vehicles, and you can’t get a clean shot. Embrace this and make a point of it! Shots of animals and people’s reaction to them being so close can give you dramatic images and great memories of your safari photography trip.

30/ Try high key and low key
Playing with your exposure and going for a minimalistic look can add a new dimension to your safari photos.
High key photography, emphasising bright whites and light colours, creates a clean feel, and can work well on overcast days when the sky is white. A great way to start practising with this is to find an animal against a white sky, and overexpose by a stop or two to blow out the sky and give an airy feel to the image.

Conversely, low key photography emphasises darker tones and deeper shadows, ideal for dramatic portraits. This works best if you have an animal lit by the sun against a darker background such as trees or rocks. Underexpose by 1-2 stops for that moody look.
I mainly shoot aperture priority, so the exposure compensation wheel is your friend here if you want to start experimenting.

31/ Use black and white to convey drama or texture
I love bright colours, but sometimes, stripping the colour away can be incredibly powerful.
Black and white photography can allow the textures and shapes of your subject to shine – and works especially well with patterned animals like zebras, leopards or giraffes.
Converting your image to black and white is also great for giving a boost to flat images shot on cloudy days or in disappointing light.

32/ Don’t ignore the little guys
While everyone wants jaw-dropping shots of lions and cheetahs, don’t ignore the less celebrity animals.
Some antelopes have wonderful character and colours, and if you look at your feet you may spot a colourful lizard or a fascinating dung beetle. So keep your eyes open!

33/ Look for natural framing
Trees, leaves, or even the bodies of other animals can create great natural frames which add interest to your composition.
In the image of silver-backed jackal pups below, I deliberately cropped the shot so the body of the standing puppy makes a natural frame around its siblings

34/ Try an unusual crop
You don’t always need to include the whole of the animal. If your zoom allows, why not crop in to draw the attention to details or a single individual amongst a herd.
I’ve cropped this image so you only see the eye and mouth of the mother crocodile, but it draws attention to the two babies sitting on her head.

35/ Be creative
Try to think outside the box with your images. What can you shoot that tells a story in a creative way but isn’t a basic portrait of an animal?
Perhaps a lone elephant casts a long shadow as the sun dips below the horizon. Or look for reflections in watering holes – the mirrored image can add an artistic touch.

Buy my safari prints
Did you know that all my images are available to buy as prints to hang on your wall? And if you head to my Print Store and something you like is not there, you can simply message me via the contact form or on social media and I can add it for you.

Safari photography tips: some tricks and techniques
36/ Aperture or shutter priority, or manual?
Some photographers like to make you think that if you’re not always shooting full manual, you’re just an amateur. Well I’m here to tell you that’s rubbish, so don’t worry.
Yes, you do need to get away from full auto, because although auto can be helpful and gets some things right, it often gets things wrong too.
But the ‘semi-auto’ modes, where you tell the camera your priorities and it calculates the rest, are ideal for wildlife photography. Things happen quickly and unexpectedly on safari, and there simply isn’t time for you to be fiddling with all the settings.
Looking for Africa photography safaris? Check out these photo safaris to find your dream trip

I pretty much always use Aperture Priority (AV) mode with my aperture fully wide open for lovely soft depth of field, while keeping an eye on my shutter speed to make sure it’s not too slow for fast-moving animals.
I keep my ISO on manual as well, to avoid the camera pushing it right up and giving me noisy images.
You could also use Shutter Priority (TV) mode to make sure your shutter is fast enough to freeze the action, but then you don’t have any control over the depth of field you want.

37/ Auto focus or manual focus?
Manual focus can definitely be useful at times, but in general I always use auto focus. Cameras have extremely complex and clever auto focussing systems, so why wouldn’t you use it!
You do need to understand your focussing system and know how to control it, otherwise the camera may choose to focus on the wrong thing. I use a single spot which I either point at the subject and then reframe to take the shot, or I move the spot around the frame. For fast-moving animals, the animal eye detection AI is really very good, but not always perfect.
For more on how I set up my camera for wildlife photography, check out Using The Canon R5 For Wildlife Photography: A Full Review.

38/ Use burst mode to freeze action
The animal kingdom is unpredictable, and perfect photo opportunities can happen in a flash.
Today’s DSLRs and mirrorless cameras – and even smartphones – can now shoot many frames per second, allowing you to capture a rapid sequence of images and increasing your chances of getting that razor-sharp shot of a lion leaping or a gazelle mid-air.
Later, you can sort through the burst and select the image with the perfect composition and action frozen in time.
I used a high-speed burst to take a sequence of images of this leopard snapping a flies so that I could pick the facial expression I liked best (on the right).


39/ Or experiment with slower shutter speeds
Safari photography is all about capturing movement and it can be tempting to go for the fastest shutter speeds possible to freeze the action.
Why not try using a slower shutter speed and either panning or zooming at the same time, to create a sense of motion and a very different look?
I used a slow shutter speed of 0.3 seconds and turned the zoom as I took the photo to create this impressionistic image of a lion in Botswana.

40/ Be patient
Animals move on their own schedule, and if you get bored too quickly, you may miss that dream moment. In fact, some of my best shots have happened after all the other cars have got bored and left, while we waited and were rewarded for our patience.
So embrace the waiting game! Enjoy the scenery, listen to the sounds of the savanna, but always be ready to shoot quickly when that leopard finally comes down from the tree or the sleeping lion gets up and goes on the hunt.
Click here to start planning your dream photo safari adventure!

41/ Be a team player
Sharing a vehicle means compromising sometimes. If another guest has a dream shot, or there’s only one good angle on the animal, be flexible and allow them some space, and they should do the same for you.
The same goes for your car as a whole. Don’t be that guy who parks in front or hogs the best spot for hours. You may not get every shot, but life is better when people are considerate of others too – and it’s better for the animals if they’re not being harassed by jostling cars.
Communication and courtesy go a long way in ensuring everyone gets a chance to capture unforgettable moments and has a great time in the process.

And that’s it! I hope you enjoyed all these tips for safari photography.
Want to see more of my photography or travel writing? Have comments or questions? Come follow me on Instagram, Threads or Bluesky and share your thoughts!
Buy me a coffee
Did you enjoy this website or find it useful? If you did and fancy showing your appreciation, that would be amazing!
A small token of support helps keep Passport & Pixels going, so I can carry on creating free content for travellers like you. Also, it makes my day! Thank you!
My favourite travel tools and brands
To help you organise your trip, here’s a short list of some of the brands and tools I use over and over again when I’m planning my travels. You can see more on my Travel Resources page.
- Booking.com: A huge range of hotels to choose from, often with free cancellation. If you book hotels regularly you can earn discounts. I’m on Genius Level 3 which gets me 20% off!
- Expedia: Another great place to find hotels and Expedia also sell flights, car hire, and loads more all in one place.
- Skyscanner: The only place I ever go to search for flights and compare prices.
- Flight Centre: Booking a more complicated route? Let Flight Centre organise it for you (and deal with the drama when something goes wrong).
- Priority Pass: I love having access to 1600+ airport lounges when I fly, allowing me to enjoy my time at the airport. Buy through my link and you get up to 20% off!
- Airalo: Say goodbye to ridiculous mobile roaming charges. Did you know you can now buy ane-SIM, install it in your phone before you leave home, and then use data abroad at local prices? Game changer. Get US$3 credit with code BELLA5735.
- TourRadar: If you prefer group travel and organised tours, TourRadar has a huge range of fantastic tours from respected operators. They’re very helpful and have 4.5 stars on TrustPilot.
- Viator: Part of the TripAdvisor brand, Viator is another great place to search for group adventures and day trips.
- GetYourGuide: A great place to find local tours and day trips in your destination.
- Wex Photo Video: The UK’s best camera gear store.
- Ellis Brigham: Looking for good quality backpacks, travel clothes and other gear? Ellis Brigham is where I buy almost all of mine.
- Rentalcars.com: Part of the Booking.com family and the world’s largest online car rental service, with 24/7 customer service.
- World Nomads Travel Insurance: I never ever travel without travel insurance and nor should you!

Where to next?
If you liked this safari photography tips post, why not try some of my other safari posts?
- A Kenya Safari Holiday: How To Plan The Perfect Trip For You
- Which Is The Best Botswana Safari Lodge? My Favourites With Photos
- Kenya Vs Tanzania: Travel Experts Decide
- 28 Brilliant Things To Do In Uganda
- 46 Amazing African Safari Animals – A Photo Guide
- What To Wear On Safari: My Detailed Safari Packing List With Photos
- My Camera Equipment List: What’s In My Gear Bag?
- Is Cardamom House In Vipingo The Best Beach Hotel In Kenya?
Liked this safari photography tips post?
Social shares help support my hard work! You can share via the buttons at the bottom, or pin this handy Pinterest Pin. Thank you!
